Honest LipSense & Senegence Review

Everyone has probably heard of LipSense at this point.  If you have SOMEHOW missed the LipSense “lady bosses” flooding your feed, let me explain.  LipSense is a product from the brand Senegence, which sells makeup and skin care. Now, the thing is that Senegence is a MLM company (that is, Multi-Level Marketing.) Which means that they have distributors that sell products and ruin friendships (kidding…sort of.)

Let me start right off the bat and say that I do NOT sell LipSense, Senegence, or any related or other products. But, I did have an opportunity to meet a distributor through Facebook who needed some models to become a licensed make-up artist for the company. I’m pretty good at saying no to salesmen, so I figured “no harm, no foul.”

The distributor was very friendly, informative, and didn’t try to sell me any product at the end of the make-up application. It did, however, give me the chance to try all of the Senegence products and get an honest opinion on quality! Here’s the final look and my reviews below:

IMG_1300


MakeSense Foundations:

Pros: Its cream based, goes on really smoothly and color matches well.  But over all it was good. It was full coverage without applying a large amount or feeling “cakey.”

Cons: The tone was a bit more yellow than I’m used to (usually more neutral tones.)

Cost: $50.00 – which is on the HIGH end of foundation for me personally. If you’re currently using Dior or Giorgio Armani or another brand of designer foundation, this might be a good price point for you. I use Maybelline (or when feeling REALLY fancy I’ll use Tarte) so , nope!

BlushSense:

Pros: Goes on very smoothly and you only need to apply a little bit. It is well pigmented and comes in some nice shades. I used Terra Cotta for blush and Bronze for bronzer.

Cons: I prefer a powder blush, but the cream bronzer was fine!

Cost: $30.00 ea – This is comparable to my blush and bronzer currently. Too Faced Chocolate Soleil is also $30.00 as is Nars blush. If these last as long they could definitely be a good option!

ShadowSense:

Pros: This stuff stays ON! I washed my face three times to get the shadow off. The colors are really beautiful and well pigmented.

Cons: Colors felt a bit limited. Great neutrals, no red tones or bright gold tones that I loved.

Cost: $22.00 ea – So every color you buy is $22.00…now, if you currently buy eyeshadow one color at a time this is comparable to Urban Decay. However, I’m a palette girl. I like a lot of colors for a flat fee, and you cannot get this with ShadowSense.

Now for the REAL question – the actual LipSense:

Pros: They are not kidding when they say that the color stays. I ate a very large plate of Chinese food right after getting the makeup done and the color was PERFECT after. It also stayed on all night, through washing my face and sleeping… so you definitely are not wasting time/money on applying this through the day. There are also some GREAT colors.

Cons: I don’t like the glossy gloss that goes on top, it felt weird. But I’m NOT a glossy lipstick girl. The matte might be better, however I didn’t try it. When the glossy gloss wore off I felt better about it.

Price: $25 for color, $20 for gloss, $10 for remover ($55 for the set.) – Apparently the color doesn’t work without a gloss on top, so that’s a must. So up front you have to spend at least $45.00.. which seems absurd to me. And even after that, the colors themselves are $25.00 a pop! That’s more than a Kylie Jenner lip kit and I thought those were too expensive. Some of Sephora’s best lip colors are no more that $20 and you can actually try before you buy.

Overall:

I think the products are great but the price points are not. I know that if you join the company and sell the products, you probably get a discount or something. But, honestly I just don’t have time for that! I’d rather just reapply my lipstick a couple times a day. Props to the lady bosses out there who are making money with Senegence and getting their products for a deal, but it isn’t for me right now.

Huge thanks to the distributor who did my makeup Brittany Gallaway. If you DO decide this is totally up your alley (like I said, the product truly is great!) than check her out on Instagram: @perfectlypoutedwithbrittany

xoxo,

ArielSense

The Happiest Place on Earth – Our Trip + Tips & Tricks

This year for our anniversary, we decided to spend less than 48 hours in California. We are straight up crazy people! All we wanted to do was spend our anniversary weekend in Disneyland, so we hopped a late night plane and headed to sunny LA.

Luckily our anniversary is in January, which is a perfect time to visit Disneyland. The crowds are less but the weather is still divine.

We got a One-Day Park Hopper pass to allow us into Disneyland Park and California Adventure, which means we had a LOT to accomplish in one day. Cue the comfy tennis shoes and yoga pants.

Major key to Disney – do your research beforehand! I found out a week before we left that there would not be a fireworks show at night, and instead they would be performing Fantasmic. The big difference here is that you need a FastPass to get a good viewing spot for Fantasmic, rather than just showing up at the castle for fireworks. So our first stop was the FastPass distribution for Fantasmic (and we ended up with FRONT ROW!!) Then we got straight onto Pirates of the Caribbean (our first ride of the day!)

The other benefit of reading up on the park before we left was that we decided to get a MaxPass. This allows you to use the Disneyland app on your phone to schedule your FastPasses for rides & download ALL your pictures that the crew members take of you at the park.

We scheduled our first FastPass to ride Radiator Springs Racers – because the line is always long and it runs out of FastPasses first.

IMG_1475

Sticking to California Adventure for the first part of our day, we also scheduled a FastPass for Guardians of the Galaxy: Mission Breakout and Soarin’ Over the World. Between waiting for our FastPasses we got some pictures!

IMG_1482IMG_1481IMG_1480IMG_1479IMG_1477

Mickey was SO cute and tried to steal me away because I “looked like Minnie Mouse!”

The new Guardians ride is amazing! Its way more exciting than the old Tower of Terror version and a thrill for a nerd like me to see all my fave heroes!

IMG_1476

After we rode Soarin’ Over the World, we had delicious burgers, waffle fries and onion rings at Smokejumpers Grill. Then, we headed back over to Disneyland for more rides and of COURSE a photo stop at the main gate.

IMG_1499

We used a FastPass for Indiana Jones and Star Tours (omg this ride was SO cool,) and in between rode the Jungle Cruise, Mad Tea Party, Matterhorn Bobsleds, and OF COURSE stopped for a Dole Whip! Make sure to go INSIDE the Tiki Room area for a shorter line!

IMG_1485

Before our FastPass to Space Mountain, we also rode it as single riders. Single Rider is great for rides with really long lines! We only waited about 10 minutes and both rode at the same time, just not right next to each other. We also walked around the Star Wars Launch Bay and got some insight on the new Galaxy’s Edge Star Wars land!!

Space Mountain was by far our favorite ride, and we rode it three different times. For our photo op, we decided to pretend we were asleep.

IMG_1503

On our way back to Main Street for some shopping, we stopped and got a picture at the Sleeping Beauty Castle!

IMG_1497IMG_1502

With a little bit of time before Fantasmic, we took a break from rides and went shopping  and bought these super cute long sleeves!

Disneyland Jersey Long Sleeve

We park hopped back over to California Adventure to possibly ride Toy Story Midway Mania, but the line was REALLY long and the FastPass was out, so we skipped it. We rode Monster’s Inc and Goofy’s Flight School instead. Then back to the Disneyland!

For dinner we had tacos and burritos at Rancho Del Zocato. Then we spent the rest of our time before Fantasmic riding the Railroad around the park. At 8:00pm we were ready for Fantasmic (which starts at 9:00pm, ) churro in hand!

Fantasmic was such a beautiful show with ALL my favorite princesses! Rapunzel, Jasmine, Ariel, and Belle were all in the show. PLUS – they had a life sized Black Pearl from Pirates of the Caribbean with show on board the ship! It was surreal.

After Fantasmic, we rode our last ride – Indiana Jones (for the 2nd time.) When we found out Big Thunder Mountain and Space Mountain were closed we decided to call it a night.

Here are our end of day stats:

Total Hours At the Park: 13.5

Total Miles Walked: 12.4

Max Wait Time (with FastPass): 20 Min

Calories Consumed: 1 Billion 😉

Fun Had: Endless


NYC – Day Three

Last but not definitely not least! Day three of NYC was PACKED full of goodies and sight-seeing. There is so much to see in Manhattan alone, we didn’t make it to a single other borough. But we definitely maximized our time where we could, starting with coffee at my fave place: Bluestone Lane (come to Seattle PLEASE!)

IMG_0907IMG_1057

We ventured on to try to see the Central Park carosel, which was sadly closed. But, we trekked on a little further and got to take pictures next to the Cherry Hill fountain, which is similar to the F.R.I.E.N.D.S. fountain!

IMG_1056

After a walk in Central Park (and getting lost looking for an exit,) we hopped the train and headed down to lower Manhattan. One of my absolute favorite stops of the trip was the 9/11 Memorial. We intentionally did not get any photos here, out of respect for those who were lost and the families still grieving them. The memorial is beautiful, though and a must-see in New York. To walk those same paths, touch the names of the fallen, and see the World Trade Center rebuilt, is extremely moving.

We also visited the grave of Alexander & Eliza Hamilton, which was really cool!

IMG_0911

A chilly walk uptown brought us through a street fair, past Wall Street, and to the best Italian sandwich I have ever had at Pisillo Italian Panini. Nicole said it tasted just like she was in Rome (and I can’t wait to find out if she was right on our trip next Summer!)

We finally made it to the Brooklyn Bridge and walked its length. These are by far the most amazing views of the city I could have imagined. The sun was perfect, even though the day was so cold. It was so very beautiful up there!

IMG_1065

IMG_8289IMG_8307IMG_8329

A fun tip that we found before the trip is to see the Statue of Liberty from the Staten Island Ferry instead of the Ellis Island one. The Staten Island Ferry takes the same route as the one to Ellis Island and is FREE! There are also little to no lines. The only downside is if you actually wanted to go TO Ellis Island, you should take that ferry instead. We lucked out and caught the ferry right before sunset, so we got to see Lady Liberty with the sun setting behind her. The sun was completely down on our way back to the city and we loved seeing the city at night. The wind and cold was insane, though! We had to keep running out to the deck, snap a quick picture, and run back inside.

IMG_0935

IMG_8376

IMG_1078IMG_0919

We finished off the day by walking through Bryant Park, right by our hotel. In the evening we donned our ice skates and took to Rockefeller Center! What a freaking dream! The magic of Christmas was just coming about and it was like something straight out of a movie.

IMG_0949IMG_0946

Nicole and I took a late night adventure to the Lower East Side for some food. My failed attempt to take us to Beauty & Essex (man that place was packed,) ended with us eating at the Stanton Social. Our only way of describing it was “swanky!” We definitely ended NYC on a high note in regards to our dining. The french onion soup dumplings were to die for!

With only four hours of sleep, we got hopelessly lost on the trains, hailed a cab to the airport and caught our flight home. Word of wisdom – subways are not as reliable on weekends…

Em & Nicole – thanks for taking trip of a lifetime with me!

Let’s hear it for New York,

Ariel

I’ve Given Up on My New Year’s Resolution

Yep. Its week 3 of the New Year and I’m already quitting on my resolution. Well, to be completely honest I didn’t make one and haven’t for a few years now. In the past I’ve been all about resolutions. I’ve resolved to eat better, journal more, be a better friend, read my bible more, actually GO to the gym, etc. I’m sure these sound familiar to you too. But I’ve simply quit on making resolutions and here’s why: I’ve never achieved a single one. 

There are many problems with resolutions, starting with the fact that they are usually not quantified, defined, or even remembered. So my husband and I have decided that instead of simply resolving to do something, we will set goals. Here’s the difference:

Resolution: a firm decision to do or not to do something

Goal: the result or achievement toward which effort is directed

By definition, I am almost setting myself up to fail a resolution. The minute I do the thing I resolved not to, I’ve failed. The second I don’t do the thing I resolved to do, I’ve missed the mark. But with a goal, I have succeeded even when I’ve just tried.

If I give my effort towards an end result, I’ve already achieved SOMETHING.

Tony and I sat down this year at a coffee shop to evaluate our 2017 goals. We realized, though we didn’t meet ALL of our goals exactly, we grew so much in our efforts. So when we went to plan our goals for 2018, they were mostly bigger and better than last year by default. We were able to celebrate our wins, adjust for our missteps, and plan for more.

This year, instead of making a resolution, why not try setting a few goals? We like to set one or two goals in a few key categories: faith, relationships, finances, health, intellect, ministry, and vocation. We also make them “SMART” goals (specific, measurable, achievable, realistic, and timely.) This helps us to better evaluate how we did on them at the end of the year. We keep each other accountable by chatting regularly about how we are doing.

It has become a fun tradition and a great topic of conversation for long car rides and trips!

Here are some examples of goals we have had over the years in these categories:

Faith: Read through the Whole Bible in a year

Relationships: Have a date night once a week with your spouse

Finances: Save an emergency fund of $1,000

Health: Do a month of Whole 30

Intellect: Read 12 books

Ministry (or community): Serve on a Sunday morning at church

Career: Be five minutes early to work every day

We’ve all been given a fresh 12-month calendar & it’s just waiting to be filled up! Each of us gets to decide what we will fill it with. Let’s be proactive this year and resolve to grow as friends, families, workers, community members and all-around humans this year. Let’s help ourselves and help each other to be the best that we can. Let’s work hard towards goals and then reap the benefits that growth brings into our lives!

New Year, New Me 😉

Ariel


Setting Up a Bullet Journal

I’m forgetful, sometimes missing events entirely. I’m lazy, often opting for sitting on the couch rather than doing the laundry. I’m not a very good planner.

BUT – I live at a mile a minute and keep a very active calendar.  I need organization, discipline, and structure in my life.

After trying a few different types of planners, I am finally landing with a “Bullet Journal.”  You might have seen this craze hitting social media. Its a version of a customized planner that you can organize to fit your lifestyle! All you need is a blank journal and a pen to start and then you can grow your collection from there.

If you have never heard of it, you should check out the official informational video to get started:

The best journal to get for this is a “dot grid” journal. You can find ALL sorts on Amazon and at Barnes and Noble. The most popularly used journal is a Leuchtturm1917, but you can definitely find cheaper ones if you’re not wanting to spend $25.00.

Here are the tools that I currently am using (linked below):

IMG_1343

Dot Grid Journal    Sharpie Pen   Faber-Castell Brush Pen    Mechanical Pencil   Pentel Eraser  6in Ruler

The Bullet Journal is specifically structured around “to-do” lists using this key:

IMG_1323

From there you can insert whatever you want! I am wanting this to be my one journal for everything – calendars, goals, devos, notes, etc. So I have set mine up as such:

IMG_1320

My events page is for large events that I know are coming up through the year such as weddings, vacations, trips, or large milestones. The year at a glance is to give me a better idea of the year and a quick and easy calendar for all of 2018!

IMG_1347

The goals spread is my fave! Not only did writing all of them down help commit them to memory, it is also pretty and fun to look at. I know this will help me to WANT to check back on my goals and review them more often.

FullSizeRender

Each of my “months” will have a cute & artsy intro page. This is just for fun and definitely not needed if you would prefer not to be artistic with your bullet journal.

IMG_1332

The month’s spreads will all get a calendar to add events to as well as a habit tracker. There are SO many different ways to do a calendar and habit tracker, so it is completely up to you.

IMG_1334

My calendar layout is designed to fit one page instead of taking up an entire spread. So the days are on the left instead of across the top.

IMG_1333

I did my habit tracker this month in different boxes. In coming months I might do it as one large graph. You can shade in the boxes as you go and successfully do the task each day!

IMG_1326 
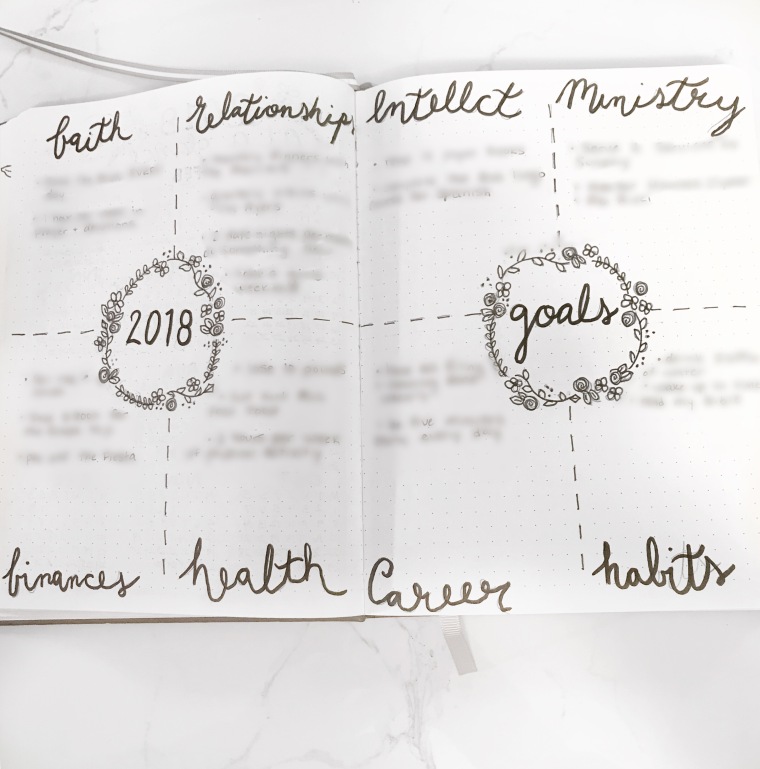
I’ll throw in some quote and art pages throughout the journal as well, these are just fun to look at and also help fill blank pages if needed. Again, if you’re not feeling creative you can leave pages blank throughout and fill them in later! I’m still learning how to hand letter and doodle, so you definitely don’t have to be perfect in order to try!

And that’s it for now! The way this works best for me is to have a page devoted to each day. A lot of people do one spread per week. It is totally up to you! I do mine by the day because I can add my to-do list, track what I eat & drink, do my devos, and write what I’m most grateful for each day. If you decide to start a bullet journal, send me pictures of yours and we can encourage each other through the year!

Happy New Year!

Ariel